 Global Price Change
![]()
 Overview
The purpose of the Global Price Changes functionality is to simplify the process of updating rates via OpsAdmin. This can currently be done through the Web Plans section on a one-to-one process which can be a bit cumbersome when dealing with a large amount of plans.
The functionality is based on scheduled changes. Users are able to schedule plan changes. It can be the rate, the billing system plan code, monthly fee, default plan or all of them at the same time. This change will be made effective on a given date, also chosen by the user. Current date can also be set so that the plan is updated on today’s date. There is a job in the backend running that takes care of picking up existing scheduled changes and updating each plan with the values provided by the user.
 Functionality Components
![]()
Global Price Changes has two components to help the user, simplifying the rate change process:
- Plans Grid
- BackEnd Job
Plans Grid
The grid shows plans and their scheduled upcoming changes.

Labels (In green) show the current plan data and textboxes (In red) are meant to be populated with the plan’s new values.
Plan fields that can be part of a scheduled change: Billing System Plan Code, Default Plan (ID and Code), Rate, Monthly Fee, Cancellation Fee Type, Cancellation Fee value, Risk Free Trial Period.
Users should use the filters on top of the screen so that the grid is filled with the plans that require an update.
BackEnd Jobs
This job can be customized based on the customers preferences so it runs several times a day. It takes care of picking up the changes scheduled for the current date and makes them effective. Users can check its status in OpsAdmin main dashboard (Background Services Status grid).
 How to Update Plans?
![]()
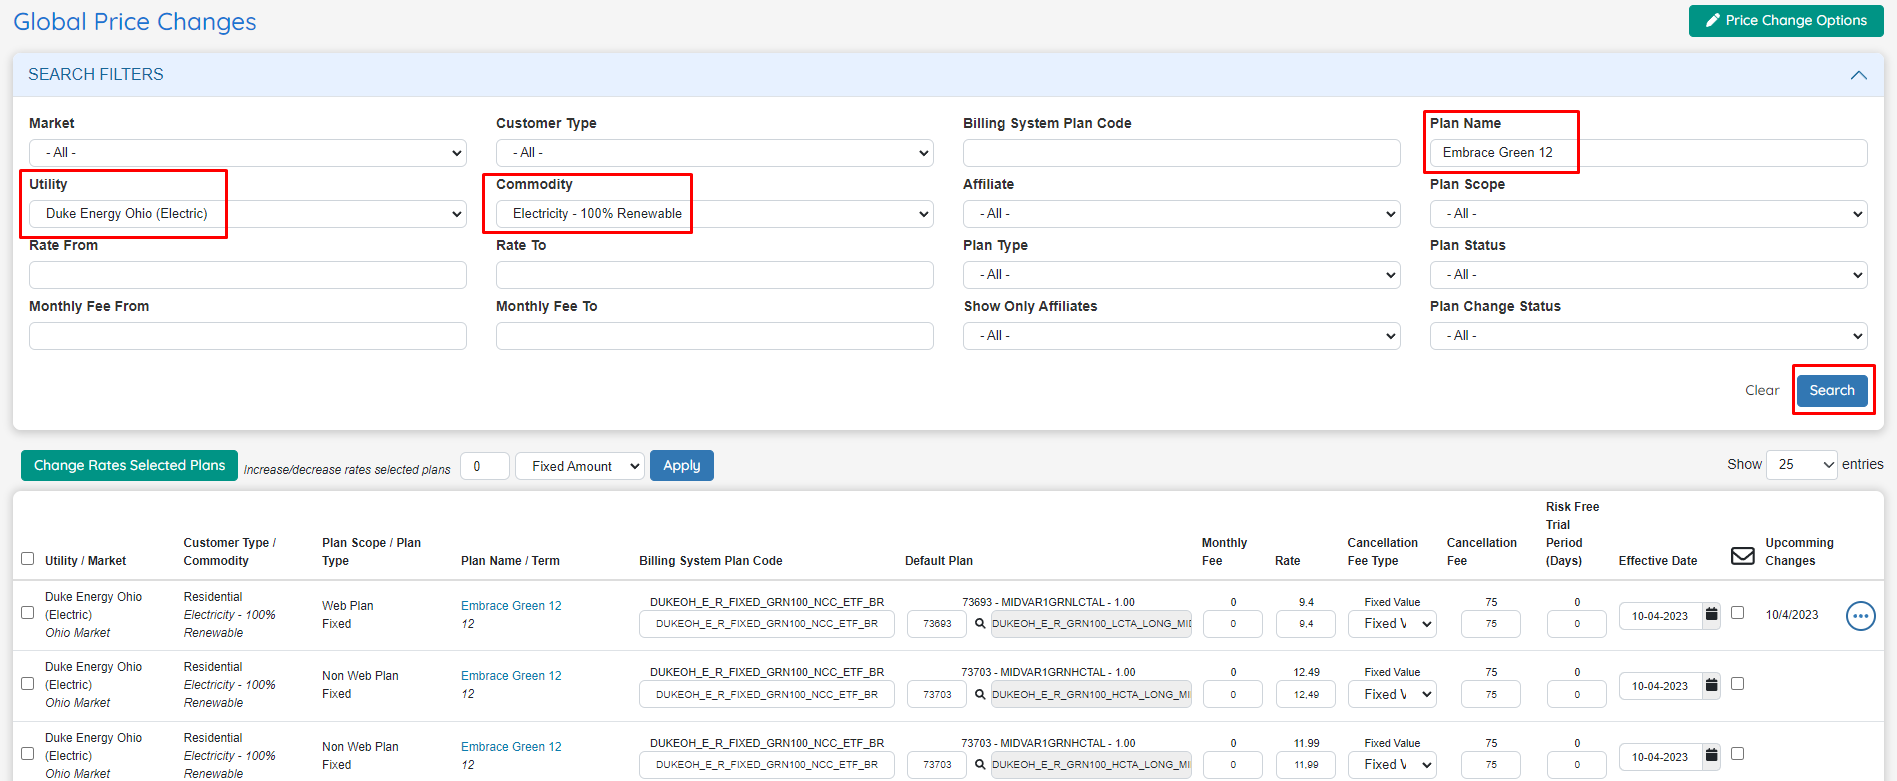
First thing to do is apply filters on the top so that the grid is filled with the desired plans:
Example: Duke Energy Ohio, Electricity 100% Renewable, Plan Name “Embrace Green 12”.
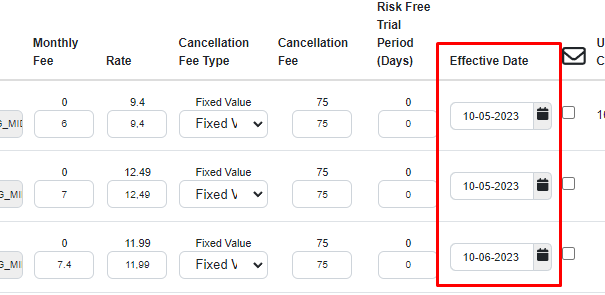
The second step is to enter the actual updates to the different fields in the textboxes for each plan.

Users should provide an Effective Date for each plan. This can be the current date or a future date.
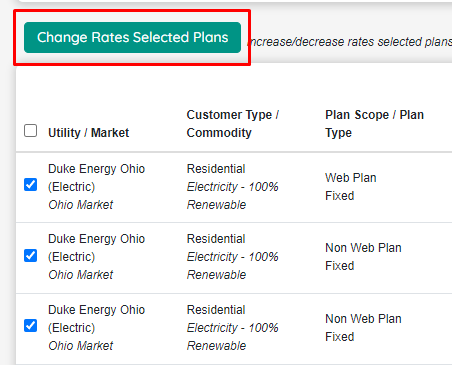
To finish, the user must activate the checkboxes for each plan that needs to be updated and hit the “Change Rate Selected Plans” button.
To assure data consistency, OpsAdmin will perform a set of validations. For example, making sure the provided rates are inside the set thresholds.


Users can make corrections and attempt again. Once the changes are successfully processed, the column “Upcoming Changes” shows when the change is actually going to occur.
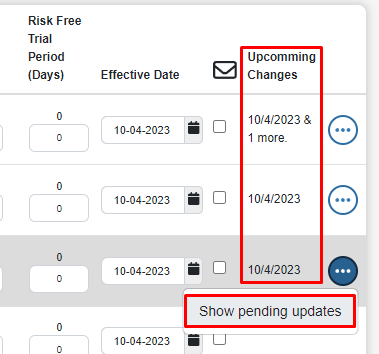
On the defined date, the backend job will perform the update on the plan. In case the effective day is the current day, the scheduler will delay the change by an hour to prevent the change from being applied immediately. The objective of this limitation is to prevent mistakes. This screen could be used to change hundreds of plans at the time and that delay gives the opportunity to corroborate and fix any involuntary mistake before it affects the plans.
 Edit and Cancel Updates
![]()
Users can edit or cancel pending updates. To do this, the user must check the Enable edit mode in the filters section before searching. This option will return only the pending changes and one registry per change, meaning that if a plan has three pending changes for three different dates, the system will show three rows. Do not confuse this option with the Show Only Plans With Pending Changes (Filter), since that one is just another filter and the screen will still add new changes, while the option explained here doesn’t allow adding changes, only editing existing ones. The edit mode purpose is to change existing scheduled updates, not adding new ones.
For example, the plan below has two changes scheduled that can be displayed using the Edit Mode. Changes are highlighted with a different color.

Multiple changes can be scheduled for a particular plan, however, it is not possible to schedule more than one change per day per plan.
 Email Affiliates
![]()
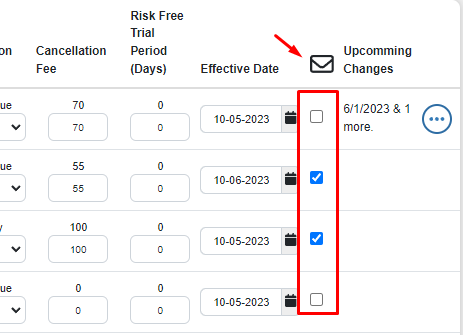
While performing updates, users can activate the checkbox under the Envelope icon column so that when an affiliate plan is updated, the affiliate is notified via email. This option requires that the affiliate is correctly set up with an email address and also with the checkbox “Send Notification Update Plan”.
 History
![]()
The history UI provides all the log data for the Global Price Functionality, showing date, user who performed the change and what exactly was changed.

 Import Changes via spreadsheet
![]()
The Global Price Changes functionality offers a smoother way of updating plans, however, when dealing with a large amount of plans, it is necessary to offer the user the possibility of uploading a spreadsheet with all the necessary changes.
This functionality is tied to the following user roles: Global Price Changes: Allow Massive Import and Global Price Changes: Download Price File.
The Price Change options button now includes the options of Downloading the Price File and Import Price Changes.
Note: The option to Export prices has been removed, but the same data can be obtained by downloading the price file.
 Download Price File
![]()
The spreadsheet must reflect a very specific format. The update is made based on the plan ID field, which is the unique identifier for a plan inside OpsAdmin. To simplify the process and reduce the possibility of user error, OpsAdmin generates the template that the user must use to import into the system and generate the future price updates.
The spreadsheet is generated with the data displayed on the main screen grid, so the first step should be to apply filters on it: Utility, Market, Affiliate, etc. until the grid is populated with the desired plans.
Once the desired plans are listed, the user can generate a spreadsheet by clicking on the Download Price File option.
If the Edit Mode is disabled, the file will be generated with one row for each particular plan. If Edit Mode is enabled the file will be generated with one row for each pending scheduled change per plan.
The spreadsheet is organized as follows:
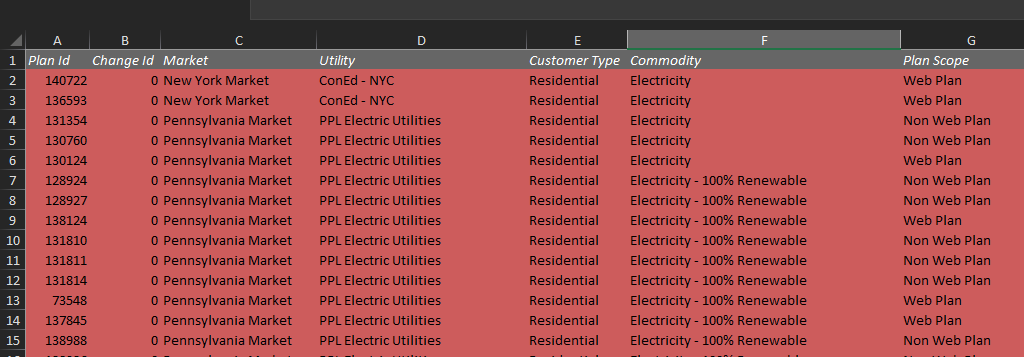
- Red Columns: These columns should be NOT CHANGED AT ALL. They show each plan’s current data and the most important field is the plan ID. This is the field used by the system to perform the update. Fields that should not be changed: Plan Id, Change Id, Market, Utility, Customer Type, Commodity, Plan Scope, Plan Type, Plan Name, Plan Term, Is Affiliate Plan, and Affiliate. These columns should be used as reference by the user to identify the plan and to make sure the update will be performed on the right plan.
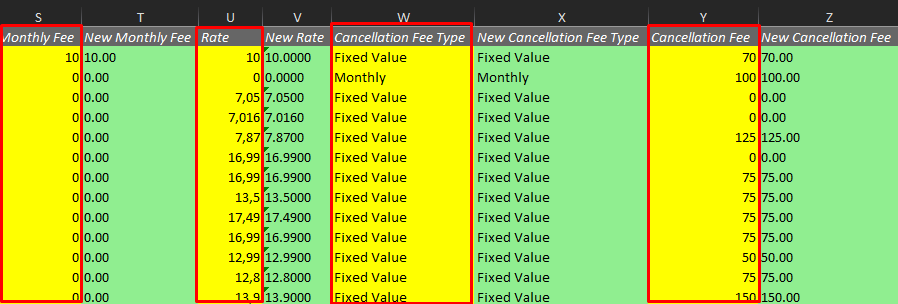
- Yellow Columns: They show current plan data and can be used as reference. Not meant to be altered. They are placed right next to the Green Columns.
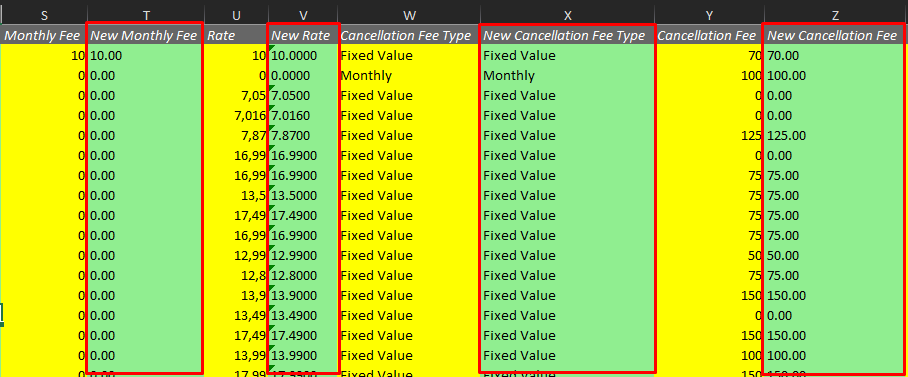
- Green Columns: These are the columns that should contain the NEW value to be updated, such as Rate, Monthly Fee, Billing System Plan Code, etc. The column header includes the word “New” to indicate that this is where the user should input the new value. These columns are populated with the current plan data by default. Users should only update/change the fields that need to be updated.
- Last columns: Check Send Email (True or False) depending on if the user wants to send the change email to the Affiliate. Cancel Price Change (True or False, default False) — this is used to cancel a change and ONLY applies when the file was generated in edit mode (changeId column != 0). If the row is marked for cancellation every other information in that row will be ignored.
 Import Price Changes
![]()
Once the file has been filled with all the necessary updates in the green columns, the user should proceed with the file import by clicking on Price Change Options >> Import Price Changes.
It is important to use the spreadsheet generated by the system and refrain from adding other books/sheets to the spreadsheet or hiding columns. File should be used as it was provided, with the updates on the green columns although it’s possible to remove full rows if there is no need to update some of the plans in the file. It’s even possible to merge the rows of several files in a single spreadsheet (for example, the files for two different utilities in a single one) but be careful that the plans don’t repeat as that will trigger an error when processing the second record.
Note: Corroborate that the dates in the file have the format MM-DD-YYYY. Sometimes Excel will overwrite the date format.
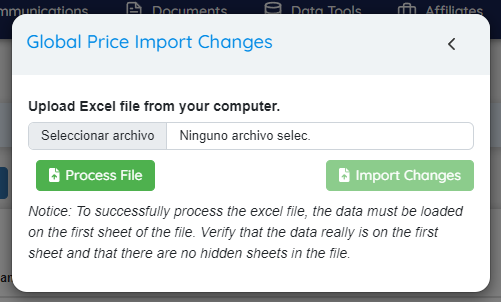
The user should attach the file and hit the “Process File” button. This action will start a validation process of the file’s content, for example: Plan doesn’t exist, Rate is outside the set thresholds, etc. Any error will be displayed as an informative message at the bottom of the screen with the option to open pop up so the user can check the details, correct the spreadsheet and repeat the process. If a row has no issue it will be marked as correctly validated.

If the user hits “Import Changes”, System will proceed with the successful rows and make a couple of extra validations.

Successfully processed rows are added to the main grid as upcoming scheduled changes. Users can make more changes in the screen or cancel the change, just as the regular Global Price Functionality usually does.
 Summary
![]()
Global Price Changes allows users to update plan rates and other details in bulk. Users can filter plans, input new values in textboxes, and schedule effective dates for these changes. A backend job applies these changes, with a delay for current-day updates to prevent errors. Users can edit or cancel pending updates in "Edit Mode", and can also choose to notify affiliates via email. For bulk changes, a spreadsheet import is available. Users download a template, update "Green Columns" with new values, and import the file. The system validates the data and schedules the successful changes, which can then be further managed in the main grid.